Aug 30, 2010

Painting Basics: How to pick a good paint brush

My brushes
There are plenty of choices out there when it comes to buying new brushes for oil painting. At an art store you will find rows and rows of different styles and shapes of brushes made from different materials. Each brush has its own purpose or is designed to be used with a particular medium. Some brushes can be really expensive and some can cost very little. 

Different shapes of brushes
Brushes are made from different types of animal hair, synthetic materials, or a blend between the two. Today I am going to focus on the natural bristle brushes used for oil painting. These brushes are made from hogs hair and they come in a variety of shapes and sizes. 

To the left you will see a sample of some of the more common shapes these brushes come in, each has its advantages and disadvantages. Some are designed for very specific purposes but all are flexible enough to be used in a variety of ways. Most of the time, it comes down to personal preference as to the types of brushes you decide to use. Once you decide on the type of brushes the question is how can you tell which brush is a good brush and which is not.

Aug 24, 2010

Drawing Basics: One Point Perspective or Single Point Perspective

One Point Perspective

In a one point perspective drawing everything seems to diminish as the objects recede into the distance and eventually disappear or vanish at a point in front of you.
  
As we look into one point perspective there some key terms to know; horizon line, vanishing point, and orthogonal lines.  

The horizon line is the eye level of the viewer.  This line sets up the orientation of the scene and gives the viewer some bearing as to how the visually relate to the image. 

In exterior scenes or other scenes where the outside is shown the horizon line is often where the sky meets the ground.  Be careful as the horizon, or the point where the sky meets the ground is not always visible so its best to think of the horizon line as being at the viewers eye level.

The vanishing point is the place on the horizon line where perceptually all things converge.  In one point perspective, the objects appear to diminish they follow a path back from the front of the scene to a single point.    

The orthogonal lines, are the lines that move from the object to the vanishing point.  The purpose of these lines is to set up the visual path to the vanishing point, directing the shape of the object in perspective. 


In one point perspective all the front planes of an object run parallel to the horizon line.  If the surface of the object is flat, the surface will appear to be directly facing the viewer. 

When drawing a cube the edges of the cube will be perpendicular to the horizon line and the top and bottom of the cube will be parallel to the horizon line.  

From the front edge of the cube, the orthogonal lines will follow a path back to the vanishing point. In the example the edges of the sides of the cube will match the path of the orthogonal lines, creating the sense of depth.

Remember that the orthogonal line is a guide it is not the actual edge of the object. The edges of more organic shapes will not trace along the orthogonal lines. Instead you will use those lines as a guide from the leading edge back to find how the object fits into perspective and create the shape to create the sense of space.

There is much more to one point perspective, but this will give you a starting point to work from. Just keep in mind that everything will diminish in size as the objects recede in the scene and the all diminish along a path back to a single point and you will be able to work out one point perspective.

One Point Perspective


Aug 21, 2010

The Blog's New Look

The blog has been updated to be a little more user friendly.  Besides the new look, a couple of other changes have been made. 

There new address is now, http://www.paintdrawpaint.com.  Don't worry your links to the old address will still work. Also, the categories section has been simpled and I moved around the content on the side bar. Other than that paint draw paint is still the same.  

Don't forget to subscribe. 

Aug 16, 2010

Quick Tip: Compressing the Value Scale

Not long ago I wrote a post on using value and value scales. In that post, I discussed the using a value scale covering the full value spectrum, from white to black and the all shades in between. This value range is a great way to create the illusion form, but you don't have to use the full range in value as you draw or paint. You can reduce the range of value to varying degrees for different effects. In fact many contemporary artists use this technique with great results.
Value scale


Aftermath No 1, Hsuan-Chi Chen, oil on panel,  6 x 6, 2010  
Here is an example of a painting where the artist purposely used only the lighter values. Notice that the shadows are just lighter than the value of the middle tone of the full value spectrum. 

Here she uses just a touch of white for the highlight and keeps the darkest part of the shadow light. The painting is now relying more on color and less on value. She may be doing this to suggest mood, or it maybe as a part of her narrative.  Regardless of reason, the artist felt it was important to reduce the range in vale for this painting.

Below is an example of the value scale the artist used. Notice how narrow the range is.  

There is no set guideline for how you reduce your value range. It is completely up to you. You may decide to use the darker side of the range or you may decide to use almost the whole spectrum, just leaving out one end or the other. 

Value range of painting above
Remember the full range of value allows for easier representation of form, but you do not have to use the full range.  Reducing the value is used for different reasons outside of creating form, such as creating mood.You can try reducing the ranges in different ways to play around with effect, maybe you will find something that works for you.


Image of Aftermath No 1, by Hsuan-Chi Chen is used with permission for more on her work visit http://www.hsuanchi.com/

Aug 11, 2010

Looking for Simple Shapes: Drawing the Hand

Charcoal drawing of a hand
Hand Drawing
In a way, this post is about how to draw the hand, but it is really about learning to simplify the forms you see to better understand what you are drawing. Today, I want to focus on drawing complex structures by finding the simple shapes first. I thought I'd demonstrate this by walking through the steps of looking at a complex form and understanding the hidden simple shapes by drawing a hand.

The hand above is the final result of my demonstration about looking for the shapes within. I chose the hand because it is one of those forms that take on dramatically different shapes depending on the action of the person and the vantage point you are looking at it.

I am not going to focus on the anatomy or the proportions of the hand, those will be for another day. Today it's all about simple shapes. We are going to see that we can manage to draw complex shapes by looking at the largest shapes first then using those large shapes as a reference to find and place the smaller shapes as we go.

Basic Shapes

Palm side of the hand
Palm facing view
Side view of a hand
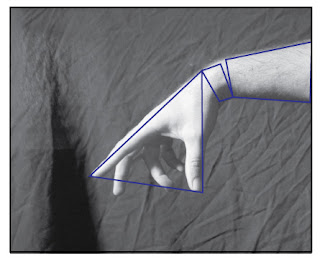
Side view of the hand
Here you will see the two images of hands, one is of a side view and one is a view with the palm facing forward. I drew over the images the largest simple shape that defines the shape of the hand from our viewpoint.

The simple shape of a hand seen from the side is that of a wedge. Seen with the palm facing the viewer the hand is basically a rectangle. Both images reflect how the hand can be viewed in terms of the most basic shapes. When in action, however, we hardly see the hand in these forms and the hand takes on shapes that never seem so simple. The trick is really just to simplify it, abstract those weird twisted forms into easily understood shapes. 

The hand reference we will use for this demonstration.
Our Project
Here is what we are going to work with.  Something not that hard and a hand in a position you may see in life. I chose a hand that, though it has minimal movement, has a position that works well for demonstrating simple shapes. 

The lighting on the hand is from a single light source. This will make it easier when dealing with the value later. 


Basic Shapes in this Hand

The simple shapes found within this hand.
Simple shapes found in a hand
For fun, I have overlaid some of the simple shapes that can be found in hand held this position. Most forms can be broken down into three simple shapes, the circle, triangle, and square, and their variations. 


Looking and the image where I have removed the photo of the hand, notice how the hand can be seen structurally in flat basic shapes.


Work Big to Small

The big underlying shapes of this hand.
Basic shapes
When starting a drawing you want to block in the largest shapes first then refine as you go; looking for the smaller shapes, checking placement, and finding even smaller shapes until one has defined the object in terms of shapes and planes.

Of course, this isn't the only way to go about drawing a complex structure but I figure it works so why not give it a try.

To the left, I have laid out the large basic shapes I see when I look and this hand. I will use these shapes as references throughout the drawing process.
Looking for Simple Shape, Drawing the Hand

Drawing the hand: Block in the larger shapes.
Block in large shapes
First, block in the large overall shape of the hand, then the smaller structures of the thumb and figure.

Find the smaller shapes and draw them in using the larger shape as a reference or guide for the placement of these smaller forms.

Careful not to go too fast in this process. It is tempting to want to put all the forms and shapes in as you see them. Be selective in the shapes you decide to draw next.
Drawing the hand: look for the smaller shapes. Check the placement.
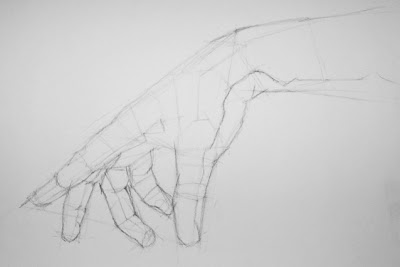
Look for smaller shapes, check placement
Next, look for and draw in the smaller shapes. In this case the rest of the fingers and more of the hand and wrist.

Don't worry about the joints or bends of the fingers yet. We aren't there yet. Just get everything in the right place.
Drawing the hand: continue to draw the smaller shapes.
Continue the process 
It is the same steps again, look for the smaller shapes and map them out in the drawing.

This is a process of repeating the steps of drawing in the shapes, just keep refining as you go.

Remember to keep checking the placement of your new shapes against your reference of the ones that you laid down earlier.

Drawing the hand, start defining the surface planes.
Start defining the surface planes
Keep refining the shapes and begin to look for surface plane changes and where the plane transitions.

 Surface planes are still just shapes that define the form. This time the shapes we are working with are less abstract and hidden, The shapes are beginning to represent the surface area of the hand.

Drawing the hand: mark the shadow boundaries.
Refine and mark shadow edges
Continue to refine the shapes you see down smaller and smaller until you are comfortable you have enough information to work with when it comes time to render the form in value.

As I refine the form and look for the plane changes, I decided that now was a good time to start mapping out the edges of the shadows.

Besides mapping out the light side and dark side of the hand, shadows can be useful guides in finding more plane changes.

Drawing the hand: shade the shadow area.
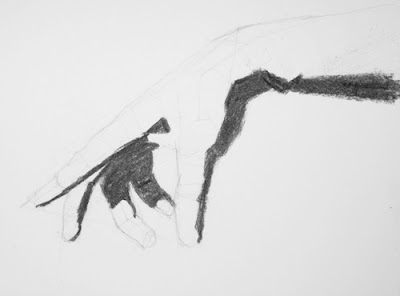
Mass in shadow shapes
Next, it's time to add the values and render the form realistically. Here, I started by massing in the shadow shapes with vine charcoal.

Drawing the hand: begin to render the form
Start to render the form
Using an HB charcoal pencil I start to match the value to the surface planes

I start by shading in the darker surfaces first and work towards the lightest surfaces.

Drawing the hand: When render adjust the surface changes.
Continue to render form, pay attention to the plane changes
Then continue to refine.
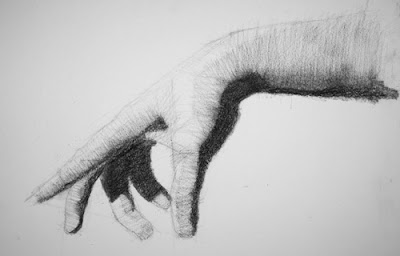
Drawing the hand: The finished drawing.
Finished hand


I am sure there are many questions about rendering the form. I will post more on that later. What I what you to remember here is that complex forms can always be broken down into simpler forms for easier understanding and drawing. Just remember to keep the basic shapes in mind and to work from the big shapes to the small ones.

To see proportional guides for hands click here.

Aug 2, 2010

Painting Basics: Setting Up Form Structure


A couple of weeks ago I talked about setting up structure for a drawing in the post Drawing Basics: Structure. I thought I'd quickly post something showing that the same technique can be applied when painting.

Simple Shapes
Find the Simple Shapes and Capture the Outlining Edges

Just like before, I find the simple shapes within the object and draw the outlining edges the object. Here I have found the basic outlying shape of the pear.

(I am painting on a panel with a neutral gray gesso. The paint I am using to draw the outlying edges and structure is raw sienna.)
Volume and planes

Volume, Find the Surface Planes

Again, I look for the volume of the subject. Just like in the other post I am looking for the surface planes and where they shift directions to determine the volumetric shape. I will draw the edges of the surface planes on the object for reference when I model the form later.

Light and Shadow
Light Side and Shadow Side

Then I define the light side and the shadow side and delineate that with a line separating the two. Now I am ready to lay in some paint.

(I will begin modeling the form by massing in the shadow side with a dark value and the light side with the appropriate value. I will cover that and the details of render form later.)


Render the Form

Pear Painting
Then I render the form and paint a pear using a full value scale. I painted this as a monochromatic painting using black and white for comparison to the drawing exercise. When painting, I used the information provided by the structure drawing I set up as a guide to place the values in the right place on the subject. Though done in oil paint the exercise follows the same basics steps we took when drawing the pear.

If you are interested in trying this and have some experience with oil paint, you don't have to do this exercise with a pear, any object will do. Pick something that has enough of an interesting shape but not something overly complex. Then give it a try. Once you have done this you will have painted your first still life. If you are not familiar with oil paint I recommend trying the drawing exercise first.